Monday, November 24, 2008

carving techniques

Heres a few grip techniques that i discovered and thought others starting spoon carving might find useful.


Grasp knife nearer the middle and pull spoon into your chest. With both hands held firm, slowly draw knife towards yourself. With practice you'll develop a good feel, and you can make very precise shaping cuts this way.


Hold knife lightly and push the spine with your thumb to make small, controlled carves


Apply strong pressure on the knife's tip and rotate your spoon to carve out the bowl, being careful not to let it slip.


acorn coffee


Shell and slice nutmeats into quarters


Leech out the bitter tannin - Boil with fresh water a few times until it comes out clear


Roast for flavor

Ground into fine powder


Add hot water and enjoy.

Sunday, November 9, 2008

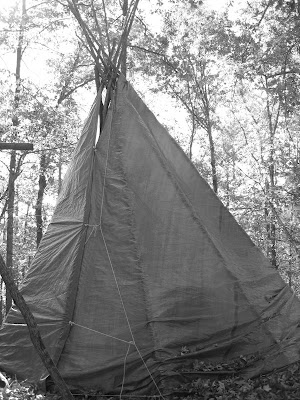
tipi

This tipi was built using two 16x20ft. tarps and i think poplar for poles. The trees grow very straight and tall in the densely packed area i got them from, theyre also very lightweight and flexible so give to the wind. i think they grew this way competing for light so thinning out a few of the weaker ones shouldnt hurt,maybe beneficial to the forest. I didnt get any plans or instructions so theres probably an easier or better way to make a tipi, but this seemed to work alright.

First take your 3 best poles and situate them on the ground where you want the center to be. Turn one of them around in the other direction then tie them about 3-4 feet from the ends.

Now spread them out into a triangle.
Begin raising them off the ground, alternating around until its erected to desired height and width.

Lay in more poles, you can make a nice tipi with 8 or so, but the tarp will sag less with 12 poles.


Lay the tarp flat on the ground, tie a pole to the short edge and roll up the tarp around it. Tie a rope to the top corner of the tarp, raise the pole and secure the rope. Unroll the tarp around the frame.
Leave a few turns of the tarp around the pole and pull the pole taught, place it in the upper frame structure.
For a smaller tipi, the one tarp could cover the whole thing.
A note on the tarps- i used the common inexpensive poly tarps you get at the hardware store. You'll usually find these in blue and grey, but its worth the extra effort to hunt down or order online ones in earth shades like brown or tan. These wont disturb as much the natural atmosphere you want to enjoy, like a bright blue construction tarp would.


Here i started another tarp the same way, with the first tarp overlapping over the back as you can see in this picture
When you finally back around to the front, you can secure the tarps together near the top, leaving a few feet open if you want to have a fire inside. If you do have a fire you'll want to tie up the bottom edge about 6" to allow air flow.
For the doorway you can see i tied a verticle line to anchor the tarp edge to, this seemed to work pretty well, with quick release knots at several points, its easy to open it a little or a lot.
Once the tarp is secured, spread out the poles to take up any slack.
Tie strings around the inside to hold the tarp straight, these will also be good to hang things from.


Friday, November 7, 2008

selfbow

Heres how to make a simple bow from a single piece of wood, what is called a selfbow. I didnt document the whole process with pictures but will add some when doing my next bow.
-First you'll want to start by finding a clean looking, straight tree of about 4" diameter, free of knots and twists. Most hardwood will make a great bow- oak, hickory, elm, ash, walnut, locust, dogwood,etc. If you have no local wood available you can buy a red oak board at home depot for $10. Choose one with the straightest grain.
-Harvest your chosen tree and cut it roughly to length leaveing a few extra inches to play with, 64-68" final length is good for a longbow, but you can easily go 72" or more.
-With a wedge or axehead, split the tree in half,or quarters if the diameter is large enough. When the head is in far enough you can insert a log and use that to finish splitting. The bark side will be the back of the bow (side facing away from you when shooting), the inside is called the belly.
-Remove only the bark and little wood from the back just until its flat, the belly is where you'll be removing the majority of wood- aiming for a width of about 2", shave the sides flat
-Now remove wood from the belly until its parellel to the back. Once the front and back are even, narrow the sides to a final width of about 1-1/2", and taper the last 8" of the limbs.
Always go slow, being in a hurry ruins bows. Stop often to feel out the bow by running your fingers back and forth in all areas to get a good feel for what the bow is doing.
-Hold the bow with your arms out and mark it at the center of your chest. Mark about a finger length on either side to allow for the grip area.
Tillering your bow
-With an axe or knife, begin shaving off wood from the belly taking note of the thickness and curve of the bow. Always follow the grain and natural twists, it will be stronger.
-Periodically check the tiller by flexing one end of the bow into the ground, you want it to bend evenly in a semi circle across its entire length, it will store the most energy and stress the least this way- once you have about the right tiller, leave some extra wood on the bow and put it up to dry in a warm area for at least 3-4 weeks, until it no longer feels cold to the touch on your face, then you can finish tillering and then sand and finish your bow.

Keep in mind the more you bend wet wood the more 'set' it will develop, meaning the limbs will naturally start to bend back, which will decrease their range of motion thus hinder performance. so dont go too far when tillering until its cured for several weeks.

If you leave it unfinished i.e. not sealed with a coating of some type, its moisture content will change depending on weather, so willbe more sluggish in humid weather and will be faster with a heavier pull in dry weather. finishing your bow with a protective coating like minwax polyurethane will seal in the moisture content and yeild a more consistent bow. You can use animal fat, linseed oil, beeswax etc. for a more natural look.

Its not a shame to sacrifice a good tree if you honor its life by crafting it into worthy bow that will see many years of use. Remember everything you take from nature is a gift, so i like to be humble and treat it with respect.

For a string, 550 parachute cord works great. If you want to go primitive and fashion your own string from leather or sinew, thatll work too. Whatever you use, make sure its test strength be at least 4 times stronger than the pull weight of your bow.

You can make or buy a tillering board. This is a very helpful device for checking tiller and measuring draw weight. Cut a notch in the top of a 1x4 to hold the bow, then cut notches in 1" graduations. By setting this on a bathroom scale you can accurately measure the weight of the draw at different draw lengths.


Freshly split staves.

Heres a couple ways you can tie the string, a double-loop and bowyer's knot.

Checking tiller- remove wood from the areas that dont bend enough.


Carve grooves for the string, narrow and thin the tips for a stronger, faster shooting bow. More energy will go to moving the arrow instead of wasted on moving the tips.


Tillering board


You can carve grooves in the handle to fit your hand better, and wrap with string for comfortable grip.

My first bow, made of white oak, stained with a walnut finish.
I hope this inspires others to experience the fun of making your own bow. With only a couple dollars and some patience you can end up with a very capable bow for target shooting or hunting, and the feeling you get of a connection to the earth and ancient times is very satisfying.
Ill do a primitive arrow build along next, im drying out some saplings that should be ready soon.

Thursday, November 6, 2008

fire

Knowing how to make fire is a necessity in the bush. Fire offers you warmth, protection from wild animals, a way to cook food, boil and purifiy water, dry clothes, make tools and signal for help. Its good to not only know several differnt methods to start a fire, but to practice regularly in different conditions and become efficient at all methods. It could save your life.

Always make sure to have plenty of firewood close by before lighting your fire , you dont want to have to keep going back for more while trying to keep the fire a'light.
Soft resinous wood and dead wood is good for starting fire, hardwoods will burn longer and give more heat.

In wet conditions

-If the ground is wet, dig a pit and and line it with dry rocks, or build a log platform and build your fire on top of this. With the dirt you dig up, make a birm around the fire and layer rocks on top of it to block the wind.

-Take standing wood thats not directly on the ground after a rain, everything on ground will be soaked through.

-Cut open wet wood to expose the dryer inner wood, set wet wood close by fire to dry.
Build a log cabin with small branches, and put your tinder inside- dry grass, leaves, wood shavings, pinecones, bark, etc.


Ignite your birds nest with your preferred method, (in this case flint and steel) and begin blowing on it, when the tinder gets going, set in small twigs vertically- they burn good this way because the flame goes up, then pile your collection of larger sticks around and on top of the fire. Continue fanning with air to build heat.


Larger branches and then finally big logs can go on top of this once the fire gets going good.


You can shave damp sticks so they catch fire more easily.


Its a good idea to carry an emergency fire starting kit. Store matches, wood shavings, dryer lint, vaselin soaked cotton balls, etc. in containers you can seal with tape to make waterproof.
Stay tuned for more as i try my hand with a friction drill next time.

spoon

Heres my first attempt at making a wooden spoon. I used a month old piece of honey locust , but forgetting what i learned in bow making, shouldve started with a green piece. The moisture inside tries to escape through the easiest part, so the ends start cracking open soon as the wood is harvested. An easy fix for this is to seal the ends with wood glue, but it would be better to start with a fresh green piece of wood, as it would also be easier to shape. Mark a rough outline of the spoon shape, with your knife or pencil, and whittle down to size alternating between knife and axe as needed.


Start gouging out the bowl shape with the corner of your axe, as it gets deeper, its easy to shave off pieces in a circular motion around the inside edges.Use a similar technique with your knife to deepen the bottom, you could do the whole thing with an axe, but the knife is nice to access the smaller areas and do more precise shaping.
Another method to create the bowl is to place a hot coal on it and let the bowl shape be burned out.

Leave some extra wood on your spoon until the inside of the bowl is roughly finished, then whittle everything to your desired final size. Using your knife or axe, a very smooth and uniformly round finish can be made by utilizing a fast drawn up and down motion, with hard pressure and at a light angle, while slowly rotating the spoon. Or finish by sanding with a smooth rock.


More to come, check back soon for different designs and other wooden crafts.

Wednesday, November 5, 2008

hobo stove

The hobo stove is lightweight, inexpensive, quick and easy to make, is efficient and fun to use. A hobo stove can be made from many different materials, food cans, paint buckets, pots, pans, scrap metal, large drums,etc. and can be constructed with a simple idea in mind, to more complex multi chamber designs.

Versatile, anything combustible can be used as a fuel source, and you can stow your cookware items inside for compact storage.

This is a common type of hobo stove, very simple, using a No.10 coffee can. With your tin snips, make an opening in one side from which to insert fuel, drilling a pilot hole in one of the corners makes it easy to get started. Drill holes near the top to hold the grill bars.


Lots of options for a grill. I cut a clotheshanger into several pieces, making sure they be long enough to reach across and bend on both sides to keep in place. Drill holes in the bottom to increase ventilation.Set it up over rocks to further increase ventilation.